Loading bar is one of essential part of a software, it guides the user when transferring files by showing how much progress it makes. Good example is a Windows OS, whenever you copy a file it automatically displays the loading window showing you how fast the file copies. But wouldn’t be great if you can design one of yours as well?
Today we will create a loading bar UI using our good friend Photoshop, you’ll learn that using simple techniques is sometimes enough to create a good web interface.
You can download the PSD at the bottom of this tutorial!
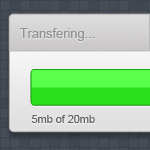
Final Product
Let’s get our hands dirty and open your Photoshop!
![1-canvas -How to Create a Loading Bar in Photoshop 1 canvas How to Create a Loading Bar UI in Photoshop](http://sanjaykhemlani.com/wp-content/uploads/2012/04/1-canvas.gif)
Open your canvas and set the width to 450px, height 400px.
![2---shape - How to Create a Loading Bar in Photoshop 2 shape How to Create a Loading Bar UI in Photoshop](http://sanjaykhemlani.com/wp-content/uploads/2012/04/2-shape.gif)
Next, grab your Rounded Rectangle Tool (U) and set the radius to 5px. Draw the rectangle at the middle of the canvas.
![3--shape-dropshadow - How to Create a Loading Bar in Photoshop 3 shape dropshadow How to Create a Loading Bar UI in Photoshop](http://sanjaykhemlani.com/wp-content/uploads/2012/04/3-shape-dropshadow.gif)
Now Right click on the rectangle layer > Blending Options and select drop shadow. Set the foreground color to #9e9c9c, angle to 90.
![4-shape-gradient - How to Create a Loading Bar in Photoshop 4 shape gradient How to Create a Loading Bar UI in Photoshop](http://sanjaykhemlani.com/wp-content/uploads/2012/04/4-shape-gradient.gif)
Go to Gradient Overlay and set this colors on the settings.
![5-shape-storke - How to Create a Loading Bar in Photoshop 5 shape storke How to Create a Loading Bar UI in Photoshop](http://sanjaykhemlani.com/wp-content/uploads/2012/04/5-shape-storke.gif)
On Stroke, set the foreground color to #acacac and size to 1px, hit OK after.
![6-header - How to Create a Loading Bar in Photoshop 6 header How to Create a Loading Bar UI in Photoshop](http://sanjaykhemlani.com/wp-content/uploads/2012/04/6-header.gif)
Create a new layer, name it header. Grab the Marquee Tool (M) and select the top part of the body. Now fill it with #c8c6c6, and CTRL + Click body layer while header is selected on the layer palette and press CTRL + SHIFT + I and hit DELETE.
![7-header-color - How to Create a Loading Bar in Photoshop 7 header color How to Create a Loading Bar UI in Photoshop](http://sanjaykhemlani.com/wp-content/uploads/2012/04/7-header-color.gif)
You should have something like this, next is to add some gradient and stuff!
![8-header-innerglow 8 header innerglow How to Create a Loading Bar UI in Photoshop](http://sanjaykhemlani.com/wp-content/uploads/2012/04/8-header-innerglow.gif)
Right Click on the header layer and select Blending Options > Inner Glow, set the color to #ffffff and size to 1, the rest are defaults.
![9-header-gradient - How to Create a Loading Bar in Photoshop 9 header gradient How to Create a Loading Bar UI in Photoshop](http://sanjaykhemlani.com/wp-content/uploads/2012/04/9-header-gradient.gif)
Next is Gradient Overlay, copy to colors and hit Ok.
![11-header-stroke - How to Create a Loading Bar in Photoshop 11 header stroke How to Create a Loading Bar UI in Photoshop](http://sanjaykhemlani.com/wp-content/uploads/2012/04/11-header-stroke.gif)
On Stroke, change the foreground color to #acacac and size to 1px.
![12-header-noise - How to Create a Loading Bar in Photoshop 12 header noise How to Create a Loading Bar UI in Photoshop](http://sanjaykhemlani.com/wp-content/uploads/2012/04/12-header-noise.gif)
Duplicate header layer and remove layer styles under. Now go to Filter > Noise > Add Noise and copy the settings above.
![13-header-text - How to Create a Loading Bar in Photoshop 13 header text How to Create a Loading Bar UI in Photoshop](http://sanjaykhemlani.com/wp-content/uploads/2012/04/13-header-text.gif)
You’re header should be the same with this one above. We will add a text on the header layer, font was arial 13pt #919191.
![14-header-text-dropshadow - How to Create a Loading Bar in Photoshop 14 header text dropshadow How to Create a Loading Bar UI in Photoshop](http://sanjaykhemlani.com/wp-content/uploads/2012/04/14-header-text-dropshadow.gif)
We will add a drop shadow to the text, set the distance and size to 1px, Blend Mode to normal and foreground color to #ffffff.
![15-loading - How to Create a Loading Bar in Photoshop 15 loading How to Create a Loading Bar UI in Photoshop](http://sanjaykhemlani.com/wp-content/uploads/2012/04/15-loading.gif)
Moving on to our loading bar, select Rounded Rectangular Tool (U) radius 5px and draw the shape same as above. Name this one loading-main.
![16-loading-dropshadow - How to Create a Loading Bar in Photoshop 16 loading dropshadow How to Create a Loading Bar UI in Photoshop](http://sanjaykhemlani.com/wp-content/uploads/2012/04/16-loading-dropshadow.gif)
On our loading-main layer, set the Drop Shadow’s Blend Mode to normal and foreground color to #ffffff, size and distance to 1px.
![17-loading-innershadow - How to Create a Loading Bar in Photoshop 17 loading innershadow How to Create a Loading Bar UI in Photoshop](http://sanjaykhemlani.com/wp-content/uploads/2012/04/17-loading-innershadow.gif)
Inner Shadow Blend Mode normal, foreground color is #ffffff and size to 1px.
![18-loading-stroke - How to Create a Loading Bar in Photoshop 18 loading stroke How to Create a Loading Bar UI in Photoshop](http://sanjaykhemlani.com/wp-content/uploads/2012/04/18-loading-stroke.gif)
On Stroke, set the foreground color to #7c7c7c and size to 1px.
![19-loading-image - How to Create a Loading Bar in Photoshop 19 loading image How to Create a Loading Bar UI in Photoshop](http://sanjaykhemlani.com/wp-content/uploads/2012/04/19-loading-image.gif)
Notice the loading-main layer style we created earlier, now we will add the green loading bar. Duplicate the loading-main (CTRL + J) and remove all the blending mode styles. Fill it with #2be11d. Name this layer as loading-green.
![20-loading-image-gradient - How to Create a Loading Bar in Photoshop 20 loading image gradient How to Create a Loading Bar UI in Photoshop](http://sanjaykhemlani.com/wp-content/uploads/2012/04/20-loading-image-gradient.gif)
In loading-green layer, select Blending Options > Gradient Overlay and copy the colors above.
![21-loading-image-gradient-settings - How to Create a Loading Bar in Photoshop 21 loading image gradient settings How to Create a Loading Bar UI in Photoshop](http://sanjaykhemlani.com/wp-content/uploads/2012/04/21-loading-image-gradient-settings.gif)
Here is the settings for Gradient, change the scale to 10%.
![22-loading-image-stroke - How to Create a Loading Bar in Photoshop 22 loading image stroke How to Create a Loading Bar UI in Photoshop](http://sanjaykhemlani.com/wp-content/uploads/2012/04/22-loading-image-stroke.gif)
Stroke’s color is #1ba910 and size is 1px.
![23-text-below - How to Create a Loading Bar in Photoshop 23 text below How to Create a Loading Bar UI in Photoshop](http://sanjaykhemlani.com/wp-content/uploads/2012/04/23-text-below.gif)
We are done with the loading bar, pretty neat right? Next is to add a text beneath it, font was arial 11pt #636363 we will also add some drop shadow onto this one.
![24-text-bottom-dropshadow - How to Create a Loading Bar in Photoshop 24 text bottom dropshadow How to Create a Loading Bar UI in Photoshop](http://sanjaykhemlani.com/wp-content/uploads/2012/04/24-text-bottom-dropshadow.gif)
On Drop Shadow’s color set to #ffffff and Blend Mode to normal, size and distance to 1px.
![25-exit-button - How to Create a Loading Bar in Photoshop 25 exit button How to Create a Loading Bar UI in Photoshop](http://sanjaykhemlani.com/wp-content/uploads/2012/04/25-exit-button.gif)
We created a sunken effect to the text. Now we also added an exit button on the top right side, font was arial 18pt bold #a4a4a4.
We are done!
![loading bar ui - How to Create a Loading Bar in Photoshop loading bar ui How to Create a Loading Bar UI in Photoshop](http://sanjaykhemlani.com/wp-content/uploads/2012/04/loading-bar-ui.png)
Now we are finished with the loading bar UI, I also added some background to make it look nice. You can use this in any project you have, and feel free to modify this to your needs.
Maybe the next one is to convert this to a working loading bar, what do you think?