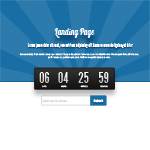
Having a Coming Soon page on your newly acquired domain will help your users that you are working on the background of the site. Since you wanted to make an impression for your users, your coming soon page should be designed well.
Today we will create a coming soon page using the minimalist approach, we will also go each step to show you the basic of design and explain how to use simple techniques to create an amazing design. Another thing you should remember is to put an opt-in form or newsletter sign up form, this is another way to build your mailing list.
You can download the PSD at the bottom of this tutorial!
Download and install the brush first;
Rising Sun Brush: Download here.
End Product
As you can see we added a timer so the users will know when is the website launch, newsletter form at the bottom and some textures on our header. Enough chit-chat, let’s start!

Open your Photoshop and create new (CTRL + N), set the width to 980px by 900.

Grab your Marquee Tool (M) and select half the layer, create a new layer (CTRL + SHIFT + N) and fill it with #176DA4. After that, go to Filter > Noise > Add noise and set it to 1%, Uniform, Monochromatic.

Set the brush to Rising Sun and use #ffff on your foreground. Make sure that the size of the brush fills everything on the header, set the opacity to 9%.

On the header, I added some text. Let me break it down for you, the first one is the name of the site. I used Lobster 13 fill it with #ffffff, size is 48pt regular.For the drop shadow, use the foreground color #0c4163 and set the size and distance to 1px, copy the layer style (to copy, right click on the layer, select Copy Layer Style. Right click on another layer and Paste Layer Style) and paste it for the second text.
Second one is Bebas 27pt same color. Third is Arial 13pt, we try to keep it simple 🙂

Next, we will create a timer container. Select Rounded Rectangular Tool (U) and set the radius to 5px, foreground is #171414.

Right click on the timer layer and select drop shadow, set the blend mode to multiply and color to #9e9c9c.

Now we will create a pattern so we can use it on the timer, create a new canvas (CTRL + N) and set the size to 5px by 5px. Select pencil (B) and draw the a diagonal line same as above.

Now, on the menus select edit > define pattern and give it a name, like diagonal pattern.

Back at our timer layer, right click and select pattern overlay and look for the pattern we just did. Set the scale to 128% and opacity to 7%.

Duplicate the timer layer and named it timer 2, disable the pattern overlay on Blend Modes and set the gradient settings, copy to colors above.

Set the gradient to revers and angle to 90%, blend mode to normal and were good to go 🙂

Next is to create a margin for the numbers layer, just make sure there are enough spaces.

Here it is, the text for numbers used was Bebas 66pt and for the Day’s words Arial 9pt.

Here is the drop shadow settings for the Timer Numbers, foreground color is #000000 and distance, size is set to 1px.

Next is the gradient settings, we used #ccbcb and #fffffff.

Now we will create the newsletter form, grab the rounded rectangle tool (U), radius is set to 5px.

Blend mode for stroke, color is #292828 and set the size to 1px opacity 17%.

Create a new layer and select the marquee tool (M) draw a shape before the of the form. Next is to fill it with #186ea5.

Next is to hold CTRL and click the layer of input form, this will select the submit layer and press CTRL + SHIFT + I and hit Delete. This will delete the excess space outside the input form. For the submit text we used Arial 18pt Bold #ffffff.
Final Product

We are done! We’ve learned a lot today, from creating a coming soon layout and designing it, and creating a pattern that we used on our design. On the next part we will code this using HTML5 / CSS3, so you can use this on your personal projects.
Hope you enjoy our tutorial and watch out for the next part!


